This post will walk a Mac user through how to get the Logictech Professional Presenter to work with Keynote. The initial steps take about 5 minutes. After that, you simply plug in your remote antenna, select the Presenter Keyboard and present.
- Green laser pointer
- 100-foot (30-meter) effective range with 2.4 GHz wireless technology
- LCD display with timer, battery-power and reception-level indicators
- Built-in slideshow buttons
- Storable plug-and-play receiver
- On/Off switch
- Carrying case
One glaring absent feature is the ability to work perfectly out of the box with Apple’s
Keynote program. Logictech does not even list Apple OS X as being compatible. Using the steps in this post, let’s take care of that.
Before discussing how to fix the remote to work with
Keynote, it must be noted that out of the box, the remote works fine with
Powerpoint.
Button Problem
The problem with the remote is related to 2 of the 4 buttons on the remote not working as
Keynote expects. After plugging in the USB antenna into your laptop and pressing the buttons on the remote, Keynote interprets the 2 lower buttons differently that expected.
The button on the lower left should “Play Slideshow” and the one on the right should “blank” the screen (the equivalent of pressing the letter B on the keyboard in Keynote). However, the “button” signal sent from the presenter to the USB antenna is not what Keynote expects. That creates the problem.
We can train Keynote so that the buttons will work as expected. The left and right slide advance work fine out of the box.
If you have a few minutes and want to use this device with Keynote on your laptop, here is what you can do:
Fixing the Play Slideshow Button
This is the easiest button to “fix”. On you computer, go to System Preferences (under the ) and select Keyboard.
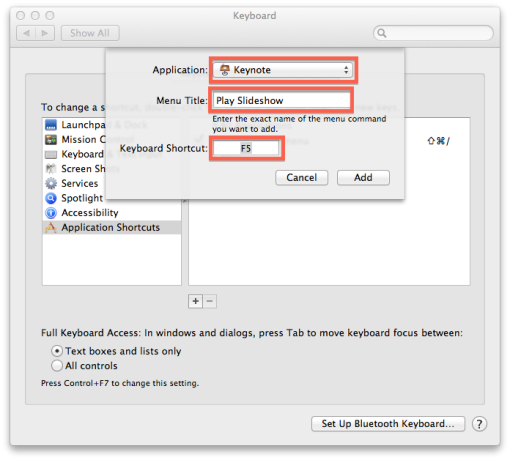
Next, select Application Shortcuts and Keyboard Shortcuts and click the + button.
You are going to want to navigate to your applications folder to where Keynote is. This is typically in the iWork folder within Applications. Once there, select Keynote.
After selecting Keynote, you are going to want to type “Play Slideshow” (Capitalization may matter so use the exact form “Play Slideshow” of one of the menu selections in Keynote under the menu item Play.) This is the menu item you will be giving the F5 shortcut to for the Play Slideshow button.
To enter the “Keyboard Shortcut” on a laptop keyboard, you will need to press the fn key at the bottom left and press the F5 button at the top of the keyboard just above the 5. You need to press and hold down the fn and then press the F5. You should see F5 appear in the Keyboard Shortcut area as shown above.
Once you plug in the USB antenna and turn on your remote, if you open a Keynote presentation now, pressing the play slideshow button on your remote should work fine.
If that’s all you want to do and you do not use the b button to blank the screen, you can stop here.
b for Blank
Next, we need to make the . on your keyboard be interpreted by Keynote as a b. When you press the blank screen button on the remote, it sends a signal that Keynote interprets as a period (although this works fine for Powerpoint). You can test this out by opening up a Keynote slide and putting the cursor where text will be entered. Insert the USB antenna, turn on the remote and press the blank screen button. You will see a .
We need to get the . to be a b. Now, there may be other ways to accomplish what you are about to do, however, this is the one that works for me. It takes a little bit of time and you will need to take one quick extra step before each presentation but, I think it is worth it to use this device.
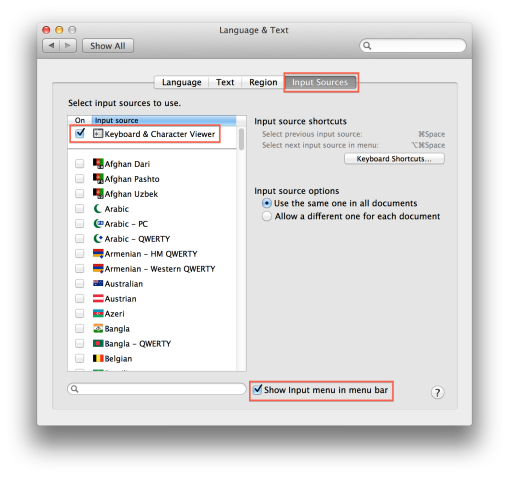
First, in System Preferences, select “Language & Text”.
Then, you will need to make sure a couple of items are selected and turned on. Click Input Sources, then check on Keyboard & Character Viewer and Show Input menu in menu bar.
Next, download an app called
Ukelele which allows you to edit your keyboard layout. Open the dmg file that was downloaded and drag the app into your applications folder. Open Ukelele.
You will see something that looks like this.
In Ukelele, select File > New From Current Input Source.
You will see a keyboard layout that shows your current keyboard. (Something like this if you have a MacBook Pro or similar laptop).
Using your mouse or touchpad move the pointer on top of the . and double tap. This lets Ukelele know you want to edit the .
You will then be asked to enter the new output for this key. Type b and press OK.
The keyboard will now look like this.
There is no . on the keyboard now.
In Ukelele, go to File > Save As.
Here, you need to save the file to the Library Folder located at the top level of your Hard Drive. Look for the folder Keyboard Layouts within Library. The path is Your HD > Library > Keyboard Layouts.
Name the file something like R800 Presenter and save it.
You will need administrator privileges. Enter the Admin name and password. You can save the file in the user library if you wish.
Quit Ukelele.
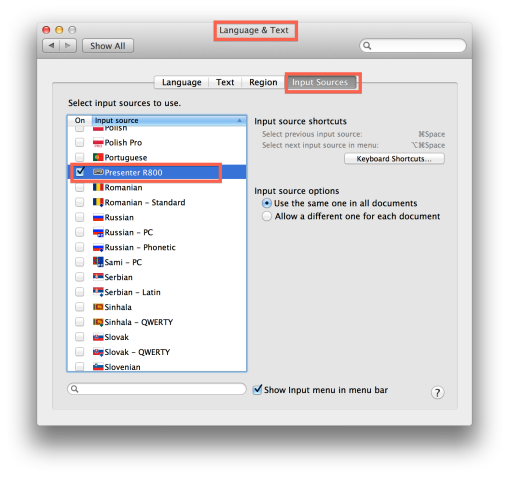
Now, open System Preferences > Language & Text and click on Input Sources.
You should not see “Presenter 800” available as an input source. Check it to make it available to you.
Now, whenever you want to use the remote with Keynote, start Keynote, plug in your device and from the top menu bar keyboard viewer (close to the spotlight symbol), select this keyboard layout.
When you are finished your presentation, reselect your other keyboard so every time you type a . it does not have a b.
Hope this helps.
Credit :
https://presentandpersuade.wordpress.com/2013/08/18/how-to-make-logictechs-r800-remote-work-with-keynote/


